JDBC身份认证
JDBC Authentication(JDBC身份认证)是通过JDBC连接数据库进行已有用户身份认证,这样避免了内存身份认证的弊端,可以实现对已注册用户进行身份认证。下面,针对JDBC身份认证方式进行讲解。
1.数据准备
JDBC身份认证的本质是使用数据库中已有的用户信息在项目中实现用户认证服务,所以需要提前准备好相关数据。这里,使用之前创建的名为springbootdata的数据库,在该数据库中创建三个表t_customer、t_authority和t_customer_authority,并预先插入几条测试数据。准备数据的SQL语句如文件1所示。
文件1 security.sql
 1    # 选择使用数据库
 2    USE springbootdata;
 3    # 创建表t_customer并插入相关数据
 4    DROP TABLE IF EXISTS `t_customer`;
 5    CREATE TABLE `t_customer` (
 6      `id` int(20) NOT NULL AUTO_INCREMENT,
 7      `username` varchar(200) DEFAULT NULL,
 8      `password` varchar(200) DEFAULT NULL,
 9      `valid` tinyint(1) NOT NULL DEFAULT '1',
 10      PRIMARY KEY (`id`)
 11    ) ENGINE=InnoDB AUTO_INCREMENT=4 DEFAULT CHARSET=utf8;
 12    INSERT INTO `t_customer` VALUES ('1', 'shitou',
 13                       '$2a$10$5ooQI8dir8jv0/gCa1Six.GpzAdIPf6pMqdminZ/3ijYzivCyPlfK', '1');
 14    INSERT INTO `t_customer` VALUES ('2', '李四',
 15                       '$2a$10$5ooQI8dir8jv0/gCa1Six.GpzAdIPf6pMqdminZ/3ijYzivCyPlfK', '1');
 16    # 创建表t_authority并插入相关数据
 17    DROP TABLE IF EXISTS `t_authority`;
 18    CREATE TABLE `t_authority` (
 19      `id` int(20) NOT NULL AUTO_INCREMENT,
 20      `authority` varchar(20) DEFAULT NULL,
 21      PRIMARY KEY (`id`)
 22    ) ENGINE=InnoDB AUTO_INCREMENT=3 DEFAULT CHARSET=utf8;
 23    INSERT INTO `t_authority` VALUES ('1', 'ROLE_common');
 24    INSERT INTO `t_authority` VALUES ('2', 'ROLE_vip');
 25    # 创建表t_customer_authority并插入相关数据
 26    DROP TABLE IF EXISTS `t_customer_authority`;
 27    CREATE TABLE `t_customer_authority` (
 28      `id` int(20) NOT NULL AUTO_INCREMENT,
 29      `customer_id` int(20) DEFAULT NULL,
 30      `authority_id` int(20) DEFAULT NULL,
 31      PRIMARY KEY (`id`)
 32    ) ENGINE=InnoDB AUTO_INCREMENT=5 DEFAULT CHARSET=utf8;
 33    INSERT INTO `t_customer_authority ` VALUES ('1', '1', '1');
 34    INSERT INTO `t_customer_authority ` VALUES ('2', '2', '2');
文件1所示的SQL语句中,创建了三个表t_customer、t_authority和t_customer_authority。其中t_customer对应于用户表,t_authority对应于用户权限表,t_customer_authority属于用户权限关联表。另外,使用JDBC身份认证方式创建用户/权限表以及初始化数据,特别注意以下几点。
● 为了演示方便,示例只创建了用户、权限和用户权限关联表,并没有对用户角色以及权限组进行扩展,这里的一个用户对应一种权限,同时也代表一种角色;
● 创建用户表t_customer时,用户名username必须唯一,因为Security进行用户查询时是先通过username定位是否存在唯一用户的;
● 创建用户表t_customer时,必须额外定义一个tinyint类型的字段(对应boolean类型的属性,例如示例中的valid),用于校验用户身份是否合法(默认都是合法的);
● 初始化用户表t_customer数据时,插入的用户密码password必须是对应编码器编码后的密码,例如示例中的密码$2a$10$5ooQI8dir8jv0/gCa1Six.GpzAdIPf6pMqdminZ/3ijYzivCyPlfK是使用BcryptPasswordEncoder密码加密后的形式(对应的原始密码为123456),因此,在自定义配置类中进行用户密码查询时,必须经过与数据库密码统一的密码编码器进行编码;
● 初始化权限表t_authority数据时,权限authority值必须带有“ROLE_”前缀,而默认的用户角色值则是对应权限值去掉“ROLE_”前缀。
2.添加JDBC连接数据库的依赖启动器
打开chapter07项目的pom.xml文件,在该文件中添加MySQL数据库连接驱动的依赖和JDBC连接依赖,示例代码如下。
<!-- JDBC数据库连接启动器 -->
<dependency>
    <groupId>org.springframework.boot</groupId>
    <artifactId>spring-boot-starter-jdbc</artifactId>
</dependency>
<!-- MySQL数据连接驱动 -->
<dependency>
    <groupId>mysql</groupId>
    <artifactId>mysql-connector-java</artifactId>
    <scope>runtime</scope>
</dependency>
3.进行数据库连接配置
在项目的全局配置文件application.properties中编写对应的数据库连接配置,内容如文件2所示。
文件2 application.properties
 1    # MySQL数据库连接配置
 2    spring.datasource.url=jdbc:mysql://localhost:3306/springbootdata?serverTimezone=UTC
 3    spring.datasource.username=root
 4    spring.datasource.password=root
4.使用JDBC进行身份认证
完成准备工作后,在configure(AuthenticationManagerBuilder auth)方法中使用JDBC身份认证的方式进行自定义用户认证,内容如文件3所示。
文件3 SecurityConfig.java
 1    import org.springframework.beans.factory.annotation.Autowired;
 2    import org.springframework.security.config.annotation.authentication.builders.*;
 3    import org.springframework.security.config.annotation.web.configuration.*;
 4    import org.springframework.security.crypto.bcrypt.BCryptPasswordEncoder;
 5    import javax.sql.DataSource;
 6    @EnableWebSecurity  // 开启MVC security安全支持
 7    public class SecurityConfig extends WebSecurityConfigurerAdapter {
 8        @Autowired
 9        private DataSource dataSource;
 10        @Override
 11        protected void configure(AuthenticationManagerBuilder auth) throws Exception {
 12            //  密码需要设置编码器
 13            BCryptPasswordEncoder encoder = new BCryptPasswordEncoder();
 14            // 2、使用JDBC进行身份认证
 15            String userSQL ="select username,password,valid from t_customer "+
 16                                       "where username = ?";
 17            String authoritySQL="select c.username,a.authority from t_customer c, "+
 18                                    "t_authority a,t_customer_authority ca where "+
 19                              "ca.customer_id=c.id and ca.authority_id=a.id and c.username =?";
 20            auth.jdbcAuthentication().passwordEncoder(encoder)
 21                    .dataSource(dataSource)
 22                    .usersByUsernameQuery(userSQL)
 23                    .authoritiesByUsernameQuery(authoritySQL);
 24        }
 25    }
文件3中,第8-9行代码使用@Autowired注解引入了DataSource数据源,重写的configure(AuthenticationManagerBuilder auth)方法中使用JDBC身份认证的方式自定义了认证用户信息。使用JDBC身份认证时,首先需要对密码进行编码设置(必须与数据库中用户密码加密方式一致);然后需要加载JDBC进行认证连接的数据源DataSource;最后,执行SQL语句,实现通过用户名username查询用户信息和用户权限。
需要注意的是,定义用户查询的SQL语句时,必须返回用户名username、密码password、是否为有效用户valid三个字段信息;定义权限查询的SQL语句时,必须返回用户名username、权限authority两个字段信息。否则,登录时输入正确的用户信息会出现PreparedStatementCallback的SQL异常错误信息。
5.效果测试
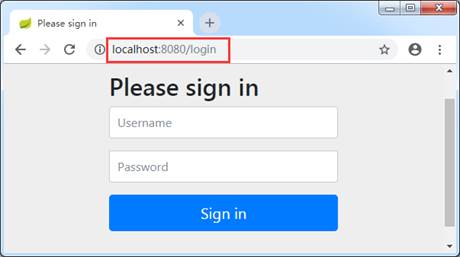
重启chapter07项目进行效果测试,项目启动成功后,通过浏览器访问“http://localhost:8080/”查看项目首页,效果如图1所示。

图1 项目首页访问效果
从图1可以看出,执行“http://localhost:8080/”访问项目首页时,自动跳转到了用户登录页面“http://localhost:8080/login”,此时可以输入错误的用户信息和正确的用户信息(数据库中初始化的用户数据)进行效果验证,发现验证结果和上一小节的示例效果一样。
