测试事务
在MyBatis+Spring的项目中,事务是由Spring来管理的。在10.1.2小节中,我们已经配置了事务管理器,并开启了事务注解,但是现在还不能够确定事务的配置是否正确,以及事务管理能否生效。接下来,本节将对如何测试项目中配置的事务进行详细讲解。
在项目中,业务层(Service层)既是处理业务的地方,又是管理数据库事务的地方。要对事务进行测试,首先需要创建业务层,并在业务层编写添加客户操作的代码;然后在添加操作的代码后,有意的添加一段异常代码(如int i = 1/0;)来模拟现实中的意外情况;最后编写测试方法,调用业务层的添加方法。这样,程序在执行到错误代码时就会出现异常。在没有事务管理的情况下,即使出现了异常,数据也会被存储到数据表中;如果添加了事务管理,并且事务管理的配置正确,那么在执行上述操作时,所添加的数据将不能够插入到数据表中。
下面对上述分析进行实际的编写测试,其具体的实现步骤如下:
(1)在CustomerMapper接口中,编写测试方法addCustomer(),代码如下所示:
// 添加客户
public void addCustomer(Customer customer);
编写完接口中的方法后,在映射文件CustomerMapper.xml中编写执行插入操作的SQL配置,代码如下所示:
<!--添加客户信息 -->
<insert id="addCustomer" parameterType="customer">
    insert into t_customer(username,jobs,phone)
    values(#{username},#{jobs},#{phone})
</insert>
(2)在src目录下,创建一个com.itheima.service包,并在包中创建接口CustomerService,在接口中编写一个添加客户的方法addCustomer(),如文件1所示。
文件1 CustomerService.java
 1    package com.itheima.service;
 2    import com.itheima.po.Customer;
 3    public interface CustomerService {
 4        public void addCustomer(Customer customer);
 5    }
(3)在src目录下,创建一个com.itheima.service.impl包,并在包中创建CustomerService接口的实现类CustomerServiceImpl,来实现接口中的方法,编辑后如文件2所示。
文件2 CustomerServiceImpl.java
 1    package com.itheima.service.impl;
 2    import org.springframework.beans.factory.annotation.Autowired;
 3    import org.springframework.stereotype.Service;
 4    import org.springframework.transaction.annotation.Transactional;
 5    import com.itheima.mapper.CustomerMapper;
 6    import com.itheima.po.Customer;
 7    import com.itheima.service.CustomerService;
 8    @Service
 9    //@Transactional
 10    public class CustomerServiceImpl implements CustomerService {
 11        //注解注入CustomerMapper
 12        @Autowired
 13        private CustomerMapper customerMapper;
 14        //添加客户
 15        public void addCustomer(Customer customer) {
 16            this.customerMapper.addCustomer(customer);
 17            int i=1/0; //模拟添加操作后系统突然出现的异常问题
 18        }
 19    }
在文件2中,使用了Spring的注解@Service来标识业务层的类,使用了@Transactional注解来标识事务处理的类,并通过@Autowired注解将CustomerMapper接口注入到本类中。
小提示:
这里先将@Transactional注解进行了注释,是为了先执行此类没有事务管理的情况。之后再删除注释,执行包含事务管理的情况,即可通过结果来验证事务是否配置成功。
(4)在Spring的配置文件中,编写开启注解扫描的配置代码,代码如下所示。
<!-- 开启扫描 -->
<context:component-scan base-package="com.itheima.service" />
(5)在com.itheima.test包中,创建测试类TransactionTest,在测试类的main()方法中编写测试事务执行的代码,如文件3所示。
文件3 TransactionTest.java
 1    package com.itheima.test;
 2    import org.springframework.context.ApplicationContext;
 3    import
 4         org.springframework.context.support.ClassPathXmlApplicationContext;
 5    import com.itheima.po.Customer;
 6    import com.itheima.service.CustomerService;
 7    /**
 8     * 测试事务
 9     */
 10    public class TransactionTest {
 11        public static void main(String[] args) {
 12            ApplicationContext act =
 13                 new ClassPathXmlApplicationContext("applicationContext.xml");
 14            CustomerService customerService =
 15                                                act.getBean(CustomerService.class);
 16            Customer customer = new Customer();
 17            customer.setUsername("zhangsan");
 18            customer.setJobs("manager");
 19            customer.setPhone("13233334444");
 20            customerService.addCustomer(customer);
 21        }
 22    }
在文件3中,首先获取了CustomerService的实例,然后创建了Customer对象,并向对象中添加属性值,最后调用了实例的addCustomer()方法执行添加客户操作。
在运行测试方法之前,先来查看一下数据库中的已有数据,如图1所示。
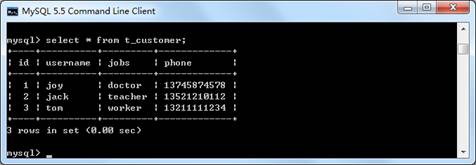
图1 t_customer表
从图1可以看到,此时数据表中只有3条数据。执行测试类中的main()方法后,控制台的输出结果如图2所示。
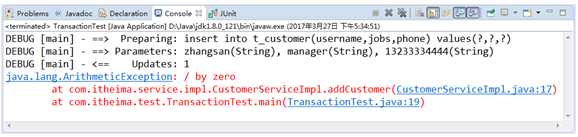
图2 运行结果
从图2可以看到,程序已经执行了插入操作,并且在执行到错误代码时抛出了异常信息。再次查询t_customer表,其表中的数据如图3所示。

图3 t_customer表
从图3可以看到,新添加的数据已经存储在了t_customer表中,这说明项目中的事务管理没有起作用。此时将文件2中@Transactional前面的注释删除,再次执行测试类中的main()方法后,虽然Eclipse的控制台也会显示抛出的异常信息,但是此时t_customer表中依然只有4条数据,如图4所示。
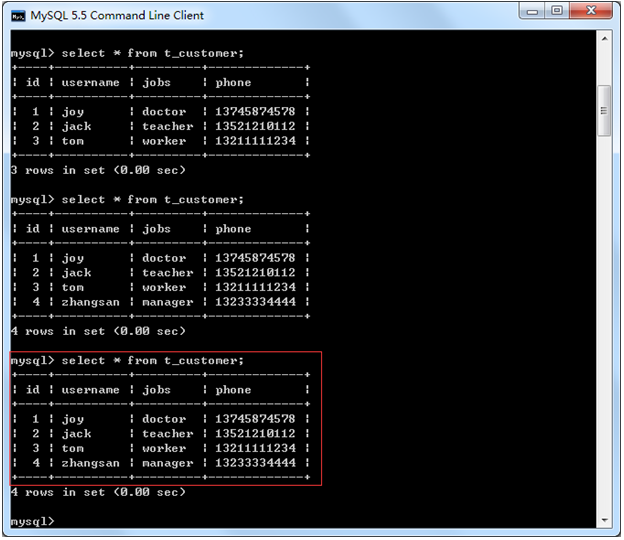
图4 t_customer表
这也就说明项目中的事务配置是正确的,至此,对于整合时事务功能的测试就已经完成。

隐藏目录