内存身份认证
In-Memory Authentication(内存身份认证)是最简单的身份认证方式,主要用于Security安全认证体验和测试。自定义内存身份认证时,只需要在重写的configure(AuthenticationManagerBuilder auth)方法中定义测试用户即可。下面,分步骤讲解Spring Boot整合Spring Security实现自定内存身份认证的实现。
1.自定义WebSecurityConfigurerAdapter配置类
在chapter07项目中创建名为com.itheima.config的包,并在该包下创建一个配置类SecurityConfig,内容如文件1所示。
文件1 SecurityConfig.java
 1    import org.springframework.security.config.annotation.web.configuration.*;
 2    @EnableWebSecurity  // 开启MVC Security安全支持
 3    public class SecurityConfig extends WebSecurityConfigurerAdapter {
 4    }
文件1中,自定义了一个继承自WebSecurityConfigurerAdapter的SecurityConfig配置类,用于进行MVC Security管理自定义配置,该类上方的@EnableWebSecurity注解是一个组合注解,主要包括@Configuration注解、@Import({WebSecurityConfiguration.class, SpringWebMvcImportSelector.class})注解和@EnableGlobalAuthentication注解。其中:
● @Configuration注解的作用是将当前自定义的SecurityConfig类作为Spring Boot的配置类;
● @Import注解的作用是根据pom.xml中导入的Web模块和Security模块进行自动化配置;
● @EnableGlobalAuthentication注解则用于开启自定义的全局认证。
需要说明的是,如果是针对于Spring WebFlux框架的安全支持,需要在项目中导入Reactive Web模块和Security模块,并使用@EnableWebFluxSecurity注解开启基于WebFlux Security的安全支持。
2.使用内存进行身份认证
在自定义的SecurityConfig类中重写configure(AuthenticationManagerBuilder auth)方法,并在该方法中使用内存身份认证的方式进行自定义用户认证,内容如文件2所示。
文件2 SecurityConfig.java
 1    import org.springframework.security.config.annotation.authentication.builders.*;
 2    import org.springframework.security.config.annotation.web.configuration.*;
 3    import org.springframework.security.crypto.bcrypt.BCryptPasswordEncoder;
 4    @EnableWebSecurity  // 开启MVC security安全支持
 5    public class SecurityConfig extends WebSecurityConfigurerAdapter {
 6        @Override
 7        protected void configure(AuthenticationManagerBuilder auth) throws Exception {
 8            //  密码需要设置编码器
 9            BCryptPasswordEncoder encoder = new BCryptPasswordEncoder();
 10            // 1、使用内存用户信息,作为测试使用
 11            auth.inMemoryAuthentication().passwordEncoder(encoder)
 12                    .withUser("shitou").password(encoder.encode("123456")).roles("common")
 13                    .and()
 14                    .withUser("李四").password(encoder.encode("123456")).roles("vip");
 15        }
 16    }
文件2中,重写了WebSecurityConfigurerAdapter类的configure(AuthenticationManagerBuilder auth)方法,并在该方法中使用内存身份认证的方式自定义了认证用户信息。定义用户认证信息时,设置了两个用户名和密码以及对应的角色信息。
文件2中进行自定义用户认证时,需要注意以下几个问题:
● 从Spring Security 5开始,自定义用户认证必须设置密码编码器用于保护密码,否则控制台会出现“IllegalArgumentException: There is no PasswordEncoder mapped for the id "null"”异常错误。
● Spring Security提供了多种密码编码器,包括BcryptPasswordEncoder、Pbkdf2PasswordEncoder、ScryptPasswordEncoder等,密码设置不限于本例中的BcryptPasswordEncoder密码编码器。
● 自定义用户认证时,可以定义用户角色roles,也可以定义用户权限authorities,在进行赋值时,权限通常是在角色值的基础上添加“ROLE_”前缀。例如,authorities("ROLE_common")和roles("common")是等效的。
● 自定义用户认证时,可以为某个用户一次指定多个角色或权限,例如roles("common","vip")或者authorities("ROLE_common"," ROLE_vip")。
3.效果测试
重启chapter07项目进行效果测试,项目启动成功后,仔细查看控制台打印信息,发现没有默认安全管理时随机生成的密码了。通过浏览器访问“http://localhost:8080/”查看首页,效果如图1所示。

图1 项目首页访问效果
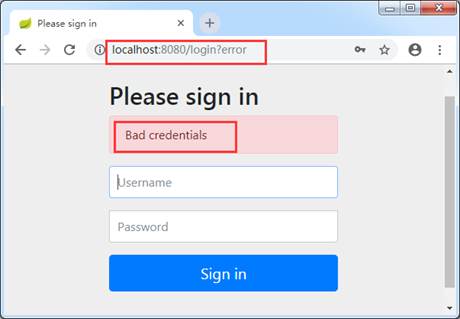
从图1可以看出,执行“http://localhost:8080/”访问项目首页时,同样自动跳转到了用户登录页面“http://localhost:8080/login”。如果输入的用户名或者密码错误,会出现相应的错误提示,效果如图2所示。

图2 项目登录错误效果
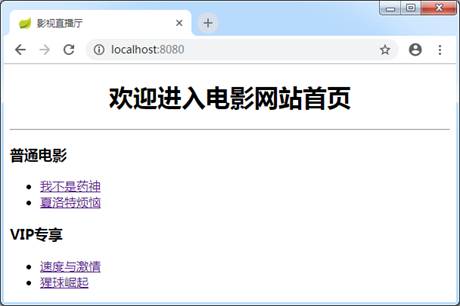
如果输入的用户名和密码正确,那么会跳转进入网站首页,效果如图3所示。

图3 项目登录成功效果
单击图3展示的电影名称同样可以查看影片详情,说明通过内存身份认证方式实现了自定义用户认证。
实际开发中,用户都是页面注册和登录进行认证管理的,而非在程序内部使用内存管理的方式手动控制注册用户,所以上述使用内存身份认证的方式无法用于实际生产,只可以作为初学者的测试使用。
