定时任务实现
下面,使用Spring Boot框架整合一个简单的定时任务案例演示对定时任务的使用。
(1)编写定时任务业务处理方法
在项目的com.itheima.service的包下新建一个定时任务管理的业务处理类ScheduledTaskService,并在该类中编写对应的定时任务处理方法,内容如文件1所示。
文件1 ScheduledTaskService.java
 1    import org.springframework.scheduling.annotation.Scheduled;
 2    import org.springframework.stereotype.Service;
 3    import java.text.SimpleDateFormat;
 4    import java.util.Date;
 5    @Service
 6    public class ScheduledTaskService {
 7        private static final SimpleDateFormat dateFormat =
 8                new SimpleDateFormat("yyyy-MM-dd HH:mm:ss");
 9        private Integer count1 = 1;
 10        private Integer count2 = 1;
 11        private Integer count3 = 1;
 12        @Scheduled(fixedRate = 60000)
 13        public void scheduledTaskImmediately() {
 14            System.out.println(String.format("fixedRate第%s次执行,当前时间为:%s",
 15                                   count1++, dateFormat.format(new Date())));
 16        }
 17        @Scheduled(fixedDelay = 60000)
 18        public void scheduledTaskAfterSleep() throws InterruptedException {
 19            System.out.println(String.format("fixedDelay第%s次执行,当前时间为:%s",
 20                                   count2++, dateFormat.format(new Date())));
 21            Thread.sleep(10000);
 22        }
 23        @Scheduled(cron = "0 * * * * *")
 24        public void scheduledTaskCron(){
 25            System.out.println(String.format("cron第%s次执行,当前时间为:%s",
 26                                   count3++, dateFormat.format(new Date())));
 27        }
 28    }
文件1中,使用@Scheduled注解声明了三个定时任务方法,这三个方法定制的执行规则基本相同,都是每隔1分钟重复执行一次定时任务,在使用fixedDelay属性的方法scheduledTaskAfterSleep()中,使用Thread.sleep(10000)模拟该定时任务处理耗时为10秒钟。需要说明的是,在Spring Boot中使用基于注解方式的定时任务注解,必须先引入Spring框架依赖,而这在之前创建项目时已经引入了Web模块的Web依赖,所以这里可以直接使用。
(2)开启基于注解的定时任务支持
为了使Spring Boot中基于注解方式的定时任务生效,还需要在项目启动类上使用@EnableScheduling注解开启基于注解的定时任务支持,内容如文件2所示。
文件2 Chapter09Application.java
 1    import org.springframework.boot.SpringApplication;
 2    import org.springframework.boot.autoconfigure.SpringBootApplication;
 3    import org.springframework.scheduling.annotation.EnableAsync;
 4    import org.springframework.scheduling.annotation.EnableScheduling;
 5    @EnableScheduling    // 开启基于注解的定时任务支持
 6    @EnableAsync          // 开启基于注解的异步任务支持
 7    @SpringBootApplication
 8    public class Chapter09Application {
 9        public static void main(String[] args) {
 10            SpringApplication.run(Chapter09Application.class, args);
 11        }
 12    }
(3)定时任务效果测试
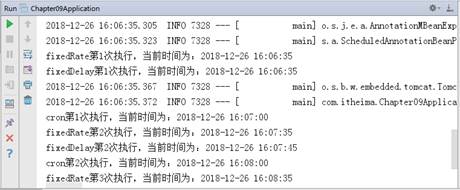
启动chapter09项目,项目启动过程中仔细查看控制台输出效果,如图1所示。

图1 定时任务调用效果
从演示结果可以看出,项目启动成功后,配置@Scheduled注解的fixedRate和fixedDelay属性的定时方法会立即执行一次,配置cron属性的定时方法会在整数分钟时间点首次执行;接着,配置fixedRate和cron属性的方法会每隔1分钟重复执行一次定时任务,而配置fixedDelay属性的方法是在上一次方法执行完成后再相隔1分钟重复执行一次定时任务
