搭建服务消费者
按照上一节的方式,继续搭建一个Eureka Client作为服务消费者,其搭建方式与服务提供者基本一样,具体步骤如下:
(1)使用Spring Initializr方式创建一个名称为eureka-consumer的Spring Boot项目,这里将Group命名为com.itheima,将Artifact命名为eureka-consumer,添加Eureka Client依赖。项目创建好后的pom.xml文件如例1所示。
例1 eureka-consumer\pom.xml
 1     <?xml version="1.0" encoding="UTF-8"?>
 2     <project xmlns="http://maven.apache.org/POM/4.0.0"
 3     xmlns:xsi="http://www.w3.org/2001/XMLSchema-instance"
 4              xsi:schemaLocation="http://maven.apache.org/POM/4.0.0
 5     https://maven.apache.org/xsd/maven-4.0.0.xsd">
 6         <modelVersion>4.0.0</modelVersion>
 7         <parent>
 8             <groupId>org.springframework.boot</groupId>
 9             <artifactId>spring-boot-starter-parent</artifactId>
 10             <version>2.1.7.RELEASE</version>
 11             <relativePath/> <!-- lookup parent from repository -->
 12         </parent>
 13         <groupId>com.itheima</groupId>
 14         <artifactId>eureka-consumer</artifactId>
 15         <version>0.0.1-SNAPSHOT</version>
 16         <name>eureka-consumer</name>
 17         <description>Demo project for Spring Boot</description>
 18         <properties>
 19             <java.version>1.8</java.version>
 20             <spring-cloud.version>Greenwich.SR2</spring-cloud.version>
 21         </properties>
 22         <dependencies>
 23             <dependency>
 24                 <groupId>org.springframework.cloud</groupId>
 25                 <artifactId>
 26                  spring-cloud-starter-netflix-eureka-client
 27                 </artifactId>
 28             </dependency>
 29             <dependency>
 30                 <groupId>org.springframework.boot</groupId>
 31                 <artifactId>spring-boot-starter-test</artifactId>
 32                 <version>2.1.7.RELEASE</version>
 33                 <scope>test</scope>
 34             </dependency>
 35            <dependency>
 36                 <groupId>org.springframework.boot</groupId>
 37                 <artifactId>spring-boot-starter-web</artifactId>
 38                 <version>2.1.7.RELEASE</version>
 39             </dependency>
 40         </dependencies>
 41         <dependencyManagement>
 42             <dependencies>
 43                 <dependency>
 44                     <groupId>org.springframework.cloud</groupId>
 45                     <artifactId>spring-cloud-dependencies</artifactId>
 46                     <version>${spring-cloud.version}</version>
 47                     <type>pom</type>
 48                     <scope>import</scope>
 49                 </dependency>
 50             </dependencies>
 51         </dependencyManagement>
 52         <build>
 53             <plugins>
 54                 <plugin>
 55                     <groupId>org.springframework.boot</groupId>
 56                     <artifactId>spring-boot-maven-plugin</artifactId>
 57                 </plugin>
 58             </plugins>
 59         </build>
 60     </project>
在例1中,第23-26行代码添加的是Eureka Discovery Client依赖,也就是eureka-consumer的依赖。
(2)在全局配置文件application.yml中添加Eureka的相关配置信息,具体如例2所示。
例2 eureka-consumer\src\main\resources\application.yml
 1     server:
 2         port: 7002 # 指定该Eureka实例的端口号
 3     spring:
 4         application:
 5             name: eureka-consumer # 用于设置服务的名字
 6     eureka:
 7         instance:
 8             prefer-ip-address: true  # 用于设置是否显示主机的IP
 9         client:
 10         service-url:
 11              defaultZone: http://localhost:7000/eureka/
在例2中,第5行指定了当前服务的名称是eureka-consumer,第8行的prefer-ip-address用于指定以IP地址注册到Eureka Server。第9-11行用于指定服务注册中心地址。
(3)在项目启动类EurekaConsumerApplication上添加@ EnableEurekaClient开启Eureka Client功能,具体如例3所示。
例3 eureka-consumer\src\main\java\com\itheima\eurekaconsumer\EurekaConsumerApplication.java
 1     @EnableEurekaClient
 2     @SpringBootApplication
 3     public class EurekaConsumerApplication {
 4         public static void main(String[] args) {
 5             SpringApplication.run(EurekaConsumerApplication.class, args);
 6         }
 7     }
(4)保证Eureka Server启动的状态下,运行EurekaConsumerApplication启动eureka-consumer。在浏览器中访问http://localhost:7000/,效果如图1所示。
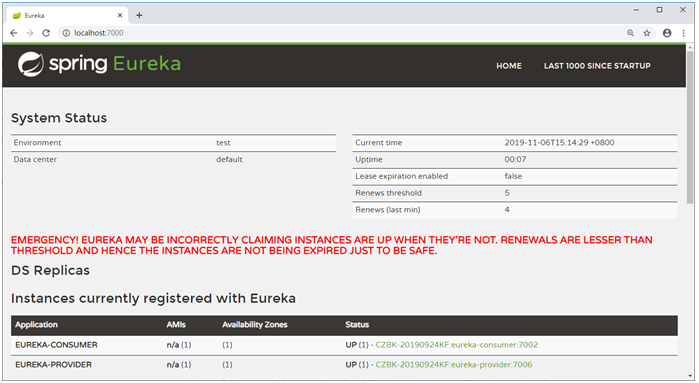
图1 eureka-consumer注册在Eureka Server的页面
在图1中,Instances currently registered with Eureka这一项中注册了一个EUREKA-CONSUMER的服务,说明我们的服务消费者已经成功注册到Eureka Server中。
小提示:
调试Eureka时,有时Eureka Server主页面会提示图1所示的警告信息。
EMERGENCY! EUREKA MAY BE INCORRECTLY CLAIMING INSTANCES ARE UP WHEN THEY'RE NOT.
RENEWALS ARE LESSER THAN THRESHOLD AND HENCE THE INSTANCES ARE NOT BEING EXPIRED JUST TO BE SAFE.
之所以出现图1所示的警告信息,是因为本地调试时触发了Eureka Server的保护机制,此时,可以在Eureka Server的全局配置文件中配置eureka.server.enable-self-preservation=false参数关闭保护机制即可。

隐藏目录