stream的消费分区
在消费组中我们可以保证消息不会被重复消费,但是在同组下有多个实例的时候,我们无法确定每次处理消息的是不是被同一消费者消费,这就要使用到Stream的消息分区,消息分区的作用就是为了确保具有共同特征标识的数据由同一个消费者实例进行处理。
Spring Cloud Stream为消息分区提供了通用的抽象实现,用来在消息中间件的上层实现消息分区处理,所以它对于消息中间件自身是否实现了消息分区并不关心,这使得Spring Cloud Stream为不具备消息分区功能的消息中间件也增加了分区功能的扩展。
实现Stream的消息分区,只需要分别在生产者和消费者的配置文件中配置下列参数:
1.生产者
● spring.cloud.stream.bindings.output.producer.partition-key-expression:该参数指定了能接收到信息的消费者的分区ID。
● spring.cloud.stream.bindings.output.producer.partition-count:该参数指定了参与消息分区的消费者数量。
2.消费者
● spring.cloud.stream.bindings.input.consumer.partitioned:通过该参数开启消费者消息分区功能。
● spring.cloud.stream.instanceCount:该参数指定了当前消费者的总实例数量。
● spring.cloud.steam.instanceIndex:该参数设置当前实例的分索引号,从0开始。在实验时可以启动多个实例,通过运行参数来为不同实例设置不同的索引值。
下面,我们在8.4.1节项目的基础上进行改造,通过一个案例讲解Stream对消息分区的支持,具体步骤如下:
(1)改造生产者。修改提供者stream-rabbitmq-provider项目的application.yml配置文件,修改后的application.yml文件如例1所示。
例1 stream-rabbitmq-provider\src\main\resources\application.yml
 1        spring:
 2           application:
 3              name: stream-rabbitmq-provider
 4           rabbitmq:
 5              host: localhost
 6              port: 5672
 7              username: guest
 8              password: guest
 9           cloud:
 10         stream:
 11           bindings:
 12             output:
 13               destination: minestream
 14          group: stream
 15           provider:
 16               partitionKeyExpression: 1
 17               partitionCount: 2
 18     server:
 19       port: 8898
上述代码中,第16行代码指定了只有分区ID为1的消费者能接收到信息,第17行代码指定参与消息分区的消费者数量为2个。
(2)改造消费者。修改消费者stream-rabbitmq-consumer项目的application.yml配置文件,修改后的application.yml文件如例2所示。
例2 stream-rabbitmq-consumer\src\main\resources\application.yml
 1     server:
 2       port: 9899
 3     spring:
 4       application:
 5         name: stream-rabbitmq-consumer
 6       cloud:
 7         stream:
 8           bindings:
 9             input:
 10               destination: minestream
 11               group: stream    #指定该应用示例属于stream消费组
 12               consumer:         #开启分区
 13                 partitioned: true   #分区数量
 14           instance-count: 2
 15           instance-index: 1         #该参数设置了当前实例的索引号
 16     rabbitmq:
 17        host: localhost
 18        port: 5672
 19        username: guest
 20        password: guest
修改消费者stream-rabbitmq-consumer2项目的application.yml配置文件,修改后的application.yml文件如例83所示。
例3 stream-rabbitmq-consumer2\src\main\resources\application.yml
 1     server:
 2       port: 9898
 3     spring:
 4       application:
 5         name: stream-rabbitmq-consumer
 6       cloud:
 7         stream:
 8           bindings:
 9             input:
 10               destination: minestream
 11               group: stream    #指定该应用示例属于stream消费组
 12               consumer:         #开启分区
 13                 partitioned: true   #分区数量
 14           instance-count: 2
 15           instance-index: 1              #该参数设置了当前实例的索引号
 16     rabbitmq:
 17        host: localhost
 18        port: 5672
 19        username: guest
 20        password: guest
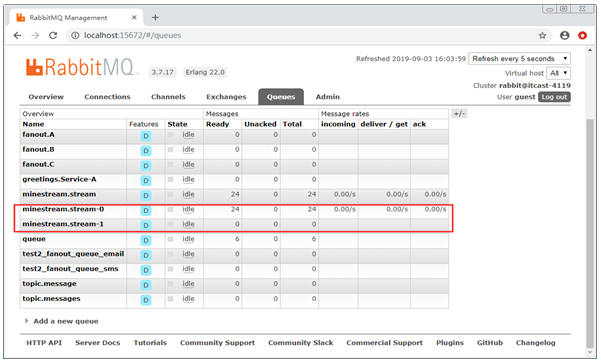
如果多个实例分区时,只需要修改端口号、instance-index的值即可,到这里消息分区配置就完成了,在RabbitMQ控制台的队列里已经生成了两个名为minestream.stream.*的队列。队列minestream.stream-0对应消费者stream-rabbitmq-consumer的分区名,队列minestream.stream-1对应消费者stream-rabbitmq-consumer2的分区名,如图1所示。

图1 RabbitMQ控制台中的消费组分区。
如果多次访问http://localhost:8898/send,发现在9899端口的控制台打印了多次日志信息“接收到MQ消息:Hello World!”,而9898端口的控制台没有,说明只有指定的分区可以接收到消息,这就是消费分区的作用。
