第一个Feign程序
这里我们将通过编写第一个Feign程序,体验如何使用Spring Cloud Feign进行声明式服务调用。第一个Feign程序的架构如图1所示。
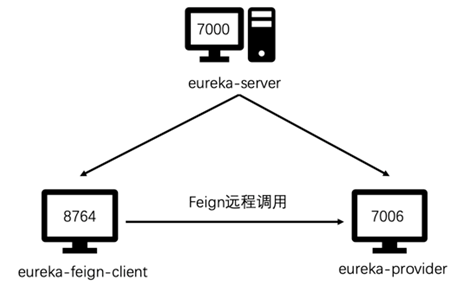
图1 第一个Feign程序的架构
开发第一个Feign程序的具体步骤如下:
1、 搭建Eureka Server
这里使用2.2.1节搭建的Spring Boot项目eureka-server作为Eureka Server。
2、 创建服务提供者
在2.2.2节创建的服务提供者eureka-provider中创建controller包,并在该包下创建HelloController类,该类定义了一个sayHello ()方法,用于处理路径为/hello的请求,如例1所示。
例1 eureka-provider\src\main\java\com\itheima\eurekaprovider\controller\HelloController.java
 1     import org.springframework.web.bind.annotation.RequestMapping;
 2     import org.springframework.web.bind.annotation.RequestMethod;
 3     import org.springframework.web.bind.annotation.RestController;
 4     @RestController
 5     public class HelloController {
 6         @RequestMapping(value = "/hello",method = RequestMethod.GET)
 7         public String sayHello(){
 8             return "hello Feign!";
 9            }
 10     }
3、创建Feign客户端
(1)使用Spring Initializr方式创建一个名称为eureka-feign-client的Spring Boot项目,这里将Group命名为com.itheima,将Artifact命名为eureka-feign-client,添加Eureka Client、Feign、Web依赖。项目创建好后的pom.xml文件如例2所示。
例2 eureka-feign-client\pom.xml
 1     <?xml version="1.0" encoding="UTF-8"?>
 2     <project xmlns="http://maven.apache.org/POM/4.0.0"
 3     xmlns:xsi="http://www.w3.org/2001/XMLSchema-instance"
 4              xsi:schemaLocation="http://maven.apache.org/POM/4.0.0
 5         https://maven.apache.org/xsd/maven-4.0.0.xsd">
 6         <modelVersion>4.0.0</modelVersion>
 7         <parent>
 8             <groupId>org.springframework.boot</groupId>
 9             <artifactId>spring-boot-starter-parent</artifactId>
 10             <version>2.1.7.RELEASE</version>
 11             <relativePath/> <!-- lookup parent from repository -->
 12         </parent>
 13         <groupId>com.itheima</groupId>
 14         <artifactId>eureka-feign-client</artifactId>
 15         <version>0.0.1-SNAPSHOT</version>
 16         <name>eureka-feign-client</name>
 17         <description>Demo project for Spring Boot</description>
 18         <properties>
 19             <java.version>1.8</java.version>
 20             <spring-cloud.version>Greenwich.SR2</spring-cloud.version>
 21         </properties>
 22         <dependencies>
 23             <dependency>
 24                 <groupId>org.springframework.boot</groupId>
 25                 <artifactId>spring-boot-starter-web</artifactId>
 26             </dependency>
 27             <dependency>
 28                 <groupId>org.springframework.cloud</groupId>
 29                 <artifactId>spring-cloud-starter-netflix-eureka-client
 30                 </artifactId>
 31             </dependency>
 32             <dependency>
 33                 <groupId>org.springframework.cloud</groupId>
 34                 <artifactId>spring-cloud-starter-openfeign</artifactId>
 35             </dependency>
 36             <dependency>
 37                 <groupId>org.springframework.boot</groupId>
 38                 <artifactId>spring-boot-starter-test</artifactId>
 39                 <scope>test</scope>
 40             </dependency>
 41         </dependencies>
 42         <dependencyManagement>
 43             <dependencies>
 44                 <dependency>
 45                     <groupId>org.springframework.cloud</groupId>
 46                     <artifactId>spring-cloud-dependencies</artifactId>
 47                     <version>${spring-cloud.version}</version>
 48                     <type>pom</type>
 49                     <scope>import</scope>
 50                 </dependency>
 51             </dependencies>
 52         </dependencyManagement>
 53         <build>
 54             <plugins>
 55                 <plugin>
 56                     <groupId>org.springframework.boot</groupId>
 57                     <artifactId>spring-boot-maven-plugin</artifactId>
 58                 </plugin>
 59             </plugins>
 60         </build>
 61     </project>
(2)引入依赖后,在全局配置文件application.yml进行相关配置,包括配置程序名称、端口号,服务注册地址等,配置后的application.yml代码如例3所示。
例3 eureka-feign-client\src\main\resources\application.yml
 1     spring:
 2       application:
 3         name: eureka-feign-client
 4     server:
 5       port: 8764
 6     eureka:
 7       client:
 8         service-url:
 9           defaultZone: http://localhost:7000/eureka
(3)在启动类EurekaFeignClientApplication中添加@EnableEurekaClient开启Eureka Client功能,添加@EnableFeignClients开启Feign Client功能,具体代码如例4所示。
例4 eureka-feign-client\src\main\java\com\itheima\eurekafeignclient\EurekaFeignClientApplication.java
 1     import org.springframework.boot.SpringApplication;
 2     import org.springframework.boot.autoconfigure.SpringBootApplication;
 3     import org.springframework.cloud.netflix.eureka.EnableEurekaClient;
 4     import org.springframework.cloud.openfeign.EnableFeignClients;
 5     @EnableEurekaClient
 6     @EnableFeignClients
 7     @SpringBootApplication
 8     public class EurekaFeignClientApplication {
 9         public static void main(String[] args) {
 10           SpringApplication.run(EurekaFeignClientApplication.class, args);
 11         }
 12     }
(4)现在实现一个简单的Feign Client。首先在eureka-feign-client中创建service包,并在该包下创建接口FeignService,通过添加@FeignClient注解指定要调用的服务,具体如例5所示。
例5 eureka-feign-client\src\main\java\com\itheima\eurekafeignclient\service\FeignService.java
 1     import org.springframework.cloud.openfeign.FeignClient;
 2     import org.springframework.stereotype.Service;
 3     import org.springframework.web.bind.annotation.RequestMapping;
 4     import org.springframework.web.bind.annotation.RequestMethod;
 5     @Service
 6     @FeignClient(name = "eureka-provider")
 7     public interface FeignService {
 8         @RequestMapping(value = "/hello",method = RequestMethod.GET)
 9         public String sayHello();
 10     }
在例5中,第6行代码通过@FeignClient注解的name属性指定FeignService接口要调用的是eureka-provider。需要注意的是,这里name属性的值,必须是服务提供者application.yml全局配置文件中指定的服务提供者的名称,而不是项目的名称。
在eureka-feign-client中创建controller包,并在该包下创建FeignController类,该类定义的hello()方法用于调用FeignService的sayHello()方法,具体如例6所示。
例6 eureka-feign-client\src\main\java\com\itheima\eurekafeignclient\controller\FeignController.java
 1     import com.itheima.eurekafeignclient.service.FeignService;
 2     import org.springframework.beans.factory.annotation.Autowired;
 3     import org.springframework.web.bind.annotation.RequestMapping;
 4     import org.springframework.web.bind.annotation.RequestMethod;
 5     import org.springframework.web.bind.annotation.RestController;
 6     @RestController
 7     public class FeignController {
 8         @Autowired
 9         FeignService feignService;
 10         @RequestMapping(value = "/hello",method = RequestMethod.GET)
 11         public String hello(){
 12             return feignService.sayHello();
 13         }
 14     }
4、启动服务并进行测试
依次启动eureka-server、eureka-provider和eureka-feign-client。启动成功后,使用浏览器访问http://localhost:8764/hello,效果如图2所示。
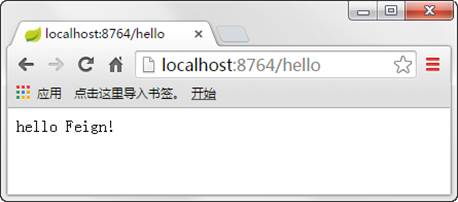
图2 浏览器访问效果图
从图2中可以看出,页面输出了调用eureka-provider服务输出的信息。与使用Ribbon调用服务相比,使用Feign远程调用服务时,只需要声明式指定要调用的服务名称,即可优雅而简单地实现服务调用。

隐藏目录