搭建Eureka Server
通过上一小节的学习,大家应该知道了Eureka Server是一个服务注册与发现的中心,有了它我们才可以注册Eureka Client,接下来我们先搭建Eureka Server,具体步骤如下:
(1)使用Spring Initializr方式创建一个名称为eureka-server的Spring Boot项目,这里将Group命名为com.itheima,将Artifact命名为eureka-server,添加Eureka Server依赖。项目创建好后的pom.xml文件如例1所示。
例1 eureka-server\pom.xml
 1     <?xml version="1.0" encoding="UTF-8"?>
 2     <project xmlns="http://maven.apache.org/POM/4.0.0"
 3     xmlns:xsi="http://www.w3.org/2001/XMLSchema-instance"
 4              xsi:schemaLocation="http://maven.apache.org/POM/4.0.0
 5     https://maven.apache.org/xsd/maven-4.0.0.xsd">
 6         <modelVersion>4.0.0</modelVersion>
 7         <parent>
 8             <groupId>org.springframework.boot</groupId>
 9             <artifactId>spring-boot-starter-parent</artifactId>
 10             <version>2.1.7.RELEASE</version>
 11             <relativePath/> <!-- lookup parent from repository -->
 12     </parent>
 13         <groupId>com.itheima</groupId>
 14         <artifactId>eureka-server</artifactId>
 15         <version>0.0.1-SNAPSHOT</version>
 16         <name>eureka-server</name>
 17         <description>Demo project for Spring Boot</description>
 18         <properties>
 19             <java.version>1.8</java.version>
 20             <spring-cloud.version>Greenwich.SR2</spring-cloud.version>
 21         </properties>
 22         <dependencies>
 23             <dependency>
 24                 <groupId>org.springframework.cloud</groupId>
 25                <artifactId>
 26                 spring-cloud-starter-netflix-eureka-server
 27                </artifactId>
 28             </dependency>
 29             <dependency>
 30                 <groupId>org.springframework.boot</groupId>
 31                 <artifactId>spring-boot-starter-test</artifactId>
 32                 <scope>test</scope>
 33             </dependency>
 34         </dependencies>
 35         <dependencyManagement>
 36             <dependencies>
 37                 <dependency>
 38                     <groupId>org.springframework.cloud</groupId>
 39                     <artifactId>spring-cloud-dependencies</artifactId>
 40                     <version>${spring-cloud.version}</version>
 41                     <type>pom</type>
 42                     <scope>import</scope>
 43                 </dependency>
 44             </dependencies>
 45         </dependencyManagement>
 46         <build>
 47             <plugins>
 48                 <plugin>
 49                     <groupId>org.springframework.boot</groupId>
 50                     <artifactId>spring-boot-maven-plugin</artifactId>
 51                 </plugin>
 52             </plugins>
 53         </build>
 54     </project>
在例1中,第10行代码指定Spring Boot的版本号是2.1.7.RELEASE,第20行代码指定Spring Cloud的版本号是Greenwich.SR2。第23-28行代码引入了eureka-server的jar包。
注意:
如果第一次在IDEA中使用Maven管理Spring Cloud Eureka,需要联网状态等待Maven自动下载Spring Cloud Eureka 的所有Jar包,这个下载过程时间有点长,需要大家耐心等待。
(2)在全局配置文件application.yml中添加Eureka的相关配置信息,如例2所示。(注:项目自动生成的配置文件为application.properties,我们直接将后缀名改掉就行。这两个文件格式都可以,只是内部的内容格式不同。)
例2 eureka-server\src\main\resources\application.yml
 1     server:
 2          port: 7000   # 服务器端口号7000
 3     spring:
 4         application:
 5             name: eureka-server    #端口号名称配置
 6     eureka:
 7         client:
 8             fetch-registry: false   # 表示是否向Eureka Server注册
 9             register-with-eureka: false  # 表示是否从Eureka Server获取注册信息
 10        service-url:
 11            defaultZone:
 12              http://${eureka.instance.hostname}:${server.port}/eureka/
 13     instance:
 14         hostname: localhost
在例2中,第2行指定了服务器端口号7000,第5行指定了当前服务名称是eureka-server,第8行的fetch-registry用于设置是否向Eureka Server注册,默认值是true。第9行的register-with-eureka表示是否从Eureka Server获取注册信息。由于这里搭建的是Eureka Server,无需注册服务,也无需获取注册信息,因此,这里将fetch-registry和register-with-eureka的值都设置为false。第10-12行用于设置服务注册中心地址。
(3)在项目启动类EurekaServerApplication上添加@EnableEurekaServer注解启动Eureka Server,具体如例3所示。
例3 eureka-server\src\main\java\com\itheima\eurekaserver\EurekaServerApplication.java
 1     @SpringBootApplication
 2     @EnableEurekaServer
 3     public class EurekaServerApplication{
 4         public static void main(String[] args) {
 5             SpringApplication.run(EurekaServerApplication.class, args);
 6         }
 7     }
(4)启动EurekaServerApplication的main()方法。启动成功后,在浏览器中访问Eureka Server的主界面http://localhost:7000/,效果如图1所示。
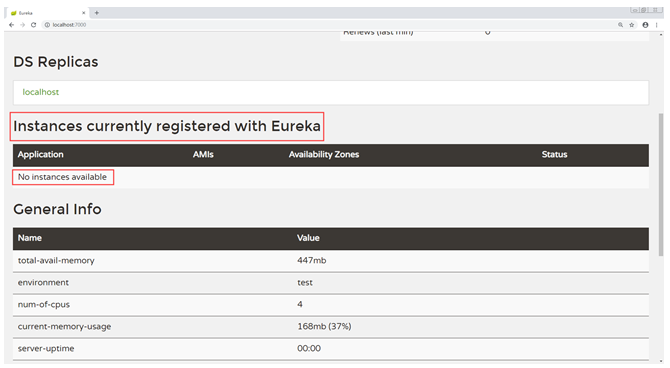
图1 Eureka Server主界面
在图1所示的Eureka Server主界面的Instances currently registered with Eureka这一项中,由于Eureka Server上没有注册任何Eureka Client,因此下面的提示信息为“No instances available”。

隐藏目录