Hystrix快速入门
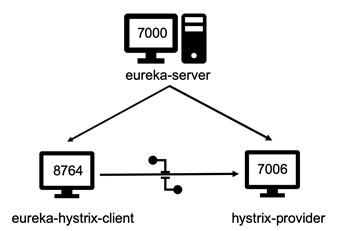
为了大家快速学习Hystrix的用法,下面我们结合前面所学的知识,构建一个如图1所示的架构。

图1 Hystrix快速入门架构
具体开发步骤如下:
(1)搭建eureka-server。这里使用前面章节搭建的Spring Boot项目eureka-server作为Eureka Server。
(2)使用Spring Initializr方式创建一个名称为eureka-hystrix-client的Spring Boot项目,这里将Group命名为com.itheima,将Artifact命名为eureka-hystrix-client,并添加Eureka Client、Web、Feign、Ribbon、Hystrix依赖,其中,Hystrix依赖具体如下所示:
 <dependency>
      <groupId>org.springframework.cloud</groupId>
      <artifactId>spring-cloud-starter-netflix-hystrix
      </artifactId>
</dependency>
(3)在eureka-hystrix-client的启动类中添加@EnableHystrix注解启动熔断功能,如例1所示。
例1 eureka-hystrix-client\src\java\com\itheima\eurekahystrixclient\EurekaHystrixClientApplication.java
 1    import org.springframework.boot.SpringApplication;
 2    import org.springframework.boot.autoconfigure.SpringBootApplication;
 3    import org.springframework.cloud.client.discovery.EnableDiscoveryClient;
 4    import org.springframework.cloud.netflix.hystrix.EnableHystrix;
 5    @EnableHystrix
 6    @SpringBootApplication
 7    @EnableEurekaClient
 8    public class EurekaHystrixClientApplication{
 9        public static void main(String[] args) {
 10               SpringApplication.run(
 11        EurekaHystrixClientApplication.class,args);
 12        }
 13    }
(3)创建config包,在config包下创建HystrixConfig类,如例2所示。
例2 eureka-hystrix-client\src\main\java\com\itheima\eurekahystrixclient\config\HystrixConfig.java
 1    import org.springframework.cloud.client.loadbalancer.LoadBalanced;
 2    import org.springframework.context.annotation.Bean;
 3    import org.springframework.context.annotation.Configuration;
 4    import org.springframework.web.client.RestTemplate;
 5    @Configuration
 6    public class HystrixConfig {
 7        @Bean
 8        @LoadBalanced
 9        public RestTemplate restTemplate(){
 10            return new RestTemplate();
 11        }
 12    }
(4)新建controller包,在controller包下新建LocalItemController类,在LocalItemController类上增加@RestController注解,如例3所示。
例3 eureka-hystrix-client\src\main\java\com\itheima\eurekahystrixclient\controller\LocalItemController.java
 1     @RestController
 2     public class LocalItemController {
 3        @Autowired
 4        LocalItemService localItemService;
 5        @GetMapping("/hi")
 6        public String hi(String id) {
 7              return localItemService.hi(id);
 8       }
 9    }
(5)新建service包,在service包下新建LocalItemService类,在 LocalItemService类中增加 @HystrixCommand注解,如例4所示。
例4 eureka-hystrix-client\src\main\java\com\itheima\eurekahystrixclient\service\LocalItemService.java
 1    import com.netflix.hystrix.contrib.javanica.annotation.HystrixCommand;
 2    import org.springframework.beans.factory.annotation.Autowired;
 3    import org.springframework.stereotype.Service;
 4    import org.springframework.web.client.RestTemplate;
 5    @Service
 6    public class LocalItemService {
 7       @Autowired
 8       private RestTemplate restTemplate;
 9       @HystrixCommand(fallbackMethod = "hiError")
 10       public String hi(String id) {
 11            return restTemplate.getForObject
 12       ("http://localhost:hystrix-provider/hi?id="
 13        + id, String.class);
 14        }
 15        public String hiError(String id) {
 16            return  String.format("Hi,your message is : %s but
 17        request bad.",id);
 18        }
 19    }
在例4中,被@HystrixCommand注解修饰的hi()方法就启动了Hystrix熔断器的功能,其中,fallbackMethod属性定义的是处理回退(fallback)逻辑的方法。如果必须在fallback逻辑方法中远程调度其他服务,最好在远程调度其他服务时,也加上熔断器。
(6)使用Spring Initializr方式创建一个名称为hystrix-provider的Spring Boot项目,这里将Group命名为com.itheima,将Artifact命名为hystrix-provider,并添加Eureka Client、Test、Web依赖。
(7) 在hystrix-provider项目创建controller包,并在controller包下的创建HystrixController类, 在HystrixController中添加hi()方法,如下所示。
@RequestMapping("/hi")
public String hi(String id){
      return "Hello World, I'm from hystix!"+id;
  }
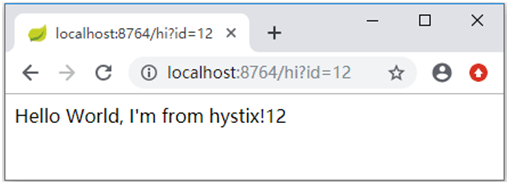
(8)启动服务并进行测试。依次启动eureka-server,hystrix-provider, eureka-hystrix-client,在浏览器输入http://localhost:8764/hi?id=12,浏览器显示的效果如图2所示。

图2 Hystrix未开启时效果展示
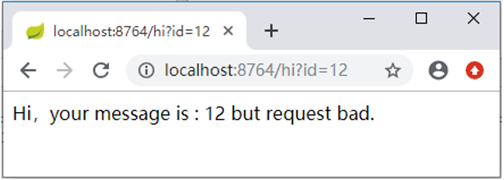
关闭服务提供者eureka-provider,制造服务不可用的情形。再次请求 http://localhost:8764/hi?id=12浏览器显示的效果如图3所示。

图3 熔断器开启后效果展示
由此可知,当服务提供者hystrix-provider不可用的情况下,如果服务消费者eureka-hystrix-client调用服务提供者hystrix-provider的“/hi”方法,就会失败,此时会开启熔断器。熔断器打开后,请求会直接执行fallbackMethod逻辑,通过快速失败,做到及时处理请求,避免线程被阻塞。
